

The Best Budget Podcast Setup for $500! | Zoom Podtrak P4 & Rode PodMic Review |

Table of contents
| 0:29 | Podcaster Basics |
| 0:59 | Zoom Podtrak P4 |
| 1:23 | XLR Inputs |
| 2:23 | USB-C Power |
| 2:50 | Rode PodMic |
| 3:30 | Cost |
| 3:52 | Sound Quality |
| 4:34 | The thing about Rode PodMics |
| 5:15 | My setup |
| 6:56 | Video Portion |
| 7:40 | Recording |
| 9:07 | The set |
- #commissionearned: Eduardo Herrera and QualiTube may earn commission at no extra cost to you
Play from here [0:00]
With podcasts becoming way more prevalent nowadays, you see everybody doing a podcast, and now you want to do a podcast. You see YouTubers and podcasters are spending thousands of dollars on their setups. With the introduction of new gear and more economic friendly gear, what if I told you that you could get just as good a podcast setup for about $500? Well, let's check it out. Let's get right into it.
Podcaster Basics
Let's start off with the basics. What do you need to start a podcast with? First of all, you're going to need an audio recorder, something that's going to capture the audio, something that you're literally going to record it with. You need a cable going to the microphone, and then, you just need the microphone. The whole point of starting this podcast is to go from an audio quality that's OK, to something that sounds a lot better. Obviously, better audio quality, something more engaging into the audience, not as much background noise, and, that's most of it.
Zoom Podtrak P4
The Zoom Podtrak P4 is Zoom's addition to the podcasting market. Normally, Zoom's audio recorders have a microphone on the top of it. Zoom said, why not just cut all of that out, make it straight up for podcasting. The first part of the setup is the audio recorder. You may be thinking, oh, an audio recorder. I could just buy a cheap one. Well, you could, but, let me tell you the great things about the Podtrak P4.

Interested?

Compact, affordable, and loaded with features, the PodTrak™ P4 makes it easy to capture professional quality audio wherever you’re recording your podcasts.
Interested?
Offering a rich, full-bodied sound, with an internal pop filter for minimising plosives, internal shockmount for reducing vibrations, and a swing mount for easy positioning, the PodMic will take your content to the next level.
XLR Inputs
First of all, XLR inputs. The Zoom Podtrak P4 has four of them. The benefit of an XLR input versus using something like your headphones or just a regular old microphone is the balanced audio. XLRs deliver a much cleaner sound. It also helps against electrical currents that may interfere with your audio. The Zoom PodTrak offers four XLR inputs for up to four microphones. Not only that, it does actually come with a 3.5mm jack. That way, you could plug in something like a regular old microphone, something like a Lavalier microphone or literally, your cell phone. Weird, right? Each XLR input comes with its own gain control, so you can adjust the audio levels of each microphone. If I turn it down, I'm going to sound a lot quieter. If I turn it up, I might get just a little bit too loud. Not only that, the PodTrak allows you to mute any XLR input. Say, you're about to sneeze. You just have to mute it, and the sneeze won't be picked up.

USB-C Power
The Zoom Podtrak P4 does take two AAA batteries. However, they thought of something kind of genius. This has a USB-C input, which means you don't need to have it just run on batteries. It can run on type C while you're using it. That's innovation. Thank you, Zoom, for that. In the past, there's just batteries, and if your battery runs out, you're screwed. You can leave this running as long as you want. That's actually insane.

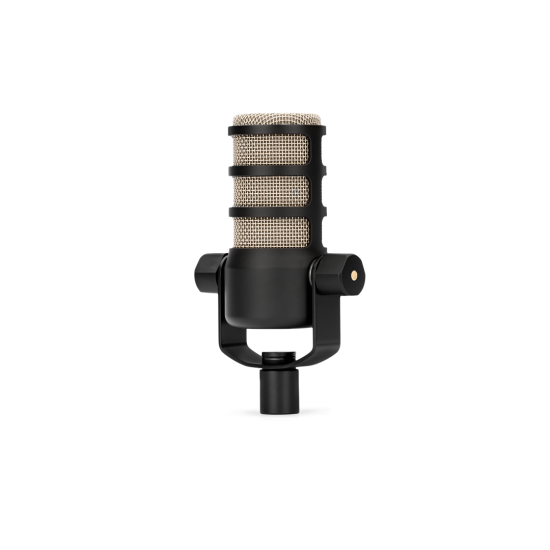
Rode PodMic
Note: All prices mentioned here can change.
I have with me two microphones. I don't want to have them both on because that could cause interference, and that's just not a good look. You may be thinking, what microphones are you using? Well, I'm using the Rode PodMic. Zoom actually has their own podcasting microphones, or at least, microphones that are sort of meant for it. They're about $100 or about the same price as the Rode PodMic. The reason I picked these up is the feedback from when touching the microphone. Looking at reviews, the Zoom ZDM-1 microphone did have a lot of feedback when touching the microphone. The Road PodMic, next to none. The Zoom ZDM-1 had a lot of issues with that.

Interested?
Compact, affordable, and loaded with features, the PodTrak™ P4 makes it easy to capture professional quality audio wherever you’re recording your podcasts.
Interested?
Offering a rich, full-bodied sound, with an internal pop filter for minimising plosives, internal shockmount for reducing vibrations, and a swing mount for easy positioning, the PodMic will take your content to the next level.
Cost
This is obviously a two person setup for about $500. The two Rode PodMics costed about $100, so both of them came out to about $200. Each cable cost me around $7. Two of those came out to about $15. The Zoom Podtrak P4 came to around $200, which all of this together, is a pretty good deal. I actually started a podcast about a week ago with my friend UNCLEAR. Here's a little clip from it.
Sound Quality

Watch the clip.
The thing about Rode PodMics
It doesn't sound half bad. Obviously, in some instances, it sounds a little bit far away. With the Rode PodMics and a lot of other cardioid microphones, you really have to get close to it. If I increase the distance a bit, it's not going to sound that great. But if I'm closer to it, it sounds a lot better. The Rode PodMic does not peak a lot. If I really try to whisper, it sounds pretty good. But if I get really loud, it doesn't peak as much. The Rode PodMic has an internal pop filter, so if I'm doing a lot of spinning or biting, it doesn't sound that bad, to be honest. Let me get out of my chair real quick to show you the setup.
My setup
Note: All prices mentioned here can change.
One thing I did not mention is you have to have a stand for your microphones. I use the Amazon Basics Microphone Stands. This is what completes the $500. These microphone wires were roughly $20 each, two of them about $40. One thing I love about the stands is it comes with a clip for you to put your microphone in. Thankfully, the Amazon Basics cables came with a little Velcro strap, so nothing to worry about there. The microphone stands will need a weight on them. Right now, I have a dumbbell wait on it. That way, it holds the Rode PodMic fine. As I'm doing the podcast, I can check in to make sure that everything is recording. Temporarily, I am using a couch for the setup. In the future, I will change it, but right now that's what I got.

Play from here [5:59]
Obviously, the aesthetic that you want to have in the background is up to you. Personally, I have my Foto FAM art, and then I have art that I made with a RAW 2¢ podcast. I have my artwork in the back, if I really want to show it. If this is just an audio podcast, then you obviously do not need all of this. Personally, I have a whole setup going on. This is completely up to you. As I am a photographer/videographer, I am going to want video. Obviously, it's not completely needed. One thing I want to mention, if you want to plug in the headphones into the Zoom Podtrak P4, you can do so. I recommend getting a six-foot cable or longer, depending on what kind of podcast you're doing.

Play from here [6:38]
As I do more with videography, I am getting more into audio, which means when I do export to audio, eventually, it will be as perfect as I want. I'm not an audio engineer, so I recommend looking up the best audio settings for what you want. Now that I'm done with the audio portion, let's get into the video because this is a little bit different.
Interested?
Compact, affordable, and loaded with features, the PodTrak™ P4 makes it easy to capture professional quality audio wherever you’re recording your podcasts.
Interested?
Offering a rich, full-bodied sound, with an internal pop filter for minimising plosives, internal shockmount for reducing vibrations, and a swing mount for easy positioning, the PodMic will take your content to the next level.
Video Portion
Let's go to the video portion of the podcasting side. Obviously, we all love our cameras. We love our DSLR mirrorless cameras. But there is one huge drawback to them, and that is, they can't record for over 30 minutes. That's only on DSLRs mirrorless cameras. If you have a phone with decent video quality and enough video storage, well, go ahead and use it. Personally, I want my podcast to be a little bit higher quality than my phone, so I'm going to use my mirrorless camera, but unfortunately it can't record more than 30 minutes, so, I had to find a loophole, and it turned out pretty good. The thing I found was the Elgato Cam Link. I just plug this into my computer, send a wire to my camera, and screen-record the camera.

Recording
I now have OBS loaded. OBS is a free video-recording software for the computer. Obviously, on your camera, a light would have popped up indicating that it is connected. I'm going to go ahead and add a scene. A scene is basically what you are going to be seeing on your actual display. By display, I mean your monitor, whatever you're recording, basically. I'm going to call this podcast. You're going to add a video capture device that is going to be something like the Elgato. I already have it, but I'm going to call it something different. I'm going to call it Elgato for Podcast. I'm going to hit OK and boom, this is the Cam Link 4K. Now that my Elgato is set up, I'm going to turn off the audio source from the Elgato, since I'm using a microphone from here.

Play from here [8:30]
I highly recommend setting up a microphone while you're recording your podcast. That way, the audio is easier to sync because if you're trying to put audio on top of lips, just moving, it's not the easiest thing to do. If you're wondering why the colors look flat right now, it is because I'm recording on C-log, a flat format used by Canon in their cameras. I highly recommend setting your settings in manual on the camera and then leaving it alone, especially in a closed environment. That way, you get the best possible shot, and you're not color-grading on a flat format. Since it is a screen recording, that's going to be extremely difficult to do. Now that I'm here, let me show you what the podcast looks like.
The set
Obviously, the camera is a tiny bit crooked, but don't worry about that. From here, you can record your camera, your screen, and you're pretty much set. You're pretty much good to go. In whatever video editing software you use, stack both the video and audio layer to get the best possible result. That's pretty much it for today.

Play from here [9:27]
All right guys, that is pretty much it for me today. I hope you guys enjoyed today's video. If you have questions or concerns, drop them in the comments here. I will get back to you as fast as possible. This is my current set up. This is the best set up I could possibly make with the budget that I had. There are a lot of different types of microphones out there. The Rode PodMic just did it for me and it was in the budget, so I definitely had to pick it up. Rode is a company I've been using for a long time and very trustworthy to me. If you guys enjoyed today's video, don't forget to like the video and comment, letting me know what you want me to do next. If you want to see individual reviews of the Rode PodMic and the Zoom Podtrak P4, let me know. We're on the road to to 1000 subscribers, so subscribe now to become a part of the Foto family. I appreciate every single one of you all. I will catch you guys in the next video whenever that is. Take it easy guys and peace. Bye!
Interested?
Compact, affordable, and loaded with features, the PodTrak™ P4 makes it easy to capture professional quality audio wherever you’re recording your podcasts.
Interested?
Offering a rich, full-bodied sound, with an internal pop filter for minimising plosives, internal shockmount for reducing vibrations, and a swing mount for easy positioning, the PodMic will take your content to the next level.

About Eduardo Herrera
A photographer and artist looking to make art more of a community. We are the FOTO FAM